本篇来总结汇总Spring各种类型后置处理器的使用。
bean定义后置处理器 bean定义后置处理器是Spring框架提供的第一个扩展点。其中有两个接口,一个是BeanFactoryPostProcessor接口,一个是BeanDefinitionRegistryPostProcessor接口。
BeanFactroyPostProcessor接口 BeanFactoryPostProcessor接口提供的扩展功能:
允许用户修改容器中的bean定义信息,调整bean定义属性值。容器会在所有bean定义信加载完毕之后回调此接口,用以修改容器中的bean定义信息 。但是不要在此接口直接通过getBean实例化bean,这样会导致bean过早实例化,违反容器规则导致不可预知的副作用。
如果要实现bean实例化请通过BeanPostProcessor接口实现。
如果有多个BeanFactoryPostProcessor接口并且需要执行它们的执行顺序可以同时实现PriorityOrdered接口或者Ordered接口。
简单讲就是,我们可以通过实现此接口获取到BeanFactory对象(就是参数),操作BeanFactory对象,修改里面的BeanDefinition。但是不要去实例化bean 。
接口的一个典型应用就是PropertySourcesPlaceholderConfigurer。
接口源码 Spring框架BeanFactoryPostProcessor接口源码如下:
1
2
3
4
5
6
7
8
9
10
11
12
13
14
15
16
17
18
19
20
21
22
23
24
25
26
27
28
29
30
31
32
33
34
35
36
37
38
39
package org.springframework.beans.factory.config;import org.springframework.beans.BeansException;@FunctionalInterface public interface BeanFactoryPostProcessor void postProcessBeanFactory (ConfigurableListableBeanFactory beanFactory) throws BeansException }
使用案例 自定义一个实现类,验证。
修改某个bean的定义信息
接口实现来显式设置为懒加载,看是否有效果(正常情况下应该是无效果的,Spring需要保证实现类提前初始化,否则谈何能修改bean定义)。容器启动的过程中就会打印构造方法的日志
1
2
3
4
5
6
7
8
9
10
11
12
13
14
15
16
17
18
19
20
21
22
23
24
25
26
27
28
29
30
31
32
33
34
35
36
37
38
39
40
41
42
43
44
45
package com.ubuntuvim.spring.beanfactorypostprocessor;import org.springframework.beans.BeansException;import org.springframework.beans.factory.config.BeanFactoryPostProcessor;import org.springframework.beans.factory.config.ConfigurableListableBeanFactory;import org.springframework.context.annotation.Lazy;import org.springframework.stereotype.Component;@Component @Lazy public class MyBeanFactoryPostProcessorImpl implements BeanFactoryPostProcessor public MyBeanFactoryPostProcessorImpl () System.out.println("\n" + this .getClass().getName() + "被加载了。。。\n" ); } @Override public void postProcessBeanFactory (ConfigurableListableBeanFactory beanFactory) throws BeansException String beanName = "lazyLoadingBean" ; System.out.println("\n" + beanName + "被设置成懒加载了。\n" ); beanFactory.getBeanDefinition(beanName).setLazyInit(true ); } }
再定义一个普通bean。
1
2
3
4
5
6
7
8
9
10
11
12
13
14
15
16
package com.ubuntuvim.spring.beanfactorypostprocessor;import org.springframework.stereotype.Component;@Component public class LazyLoadingBean public LazyLoadingBean () System.out.println("\n" + this .getClass().getName() + "被加载了。。。\n" ); } }
运行结果:
1
2
3
com.ubuntuvim.spring.beanfactorypostprocessor.MyBeanFactoryPostProcessorImpl被加载了。。。 lazyLoadingBean被设置成懒加载了。
MyBeanFactoryPostProcessorImpl被加载了,LazyLoadingBean没有被加载,把beanFactory.getBeanDefinition(beanName).setLazyInit(true);改成false再运行:
1
2
3
4
5
com.ubuntuvim.spring.beanfactorypostprocessor.MyBeanFactoryPostProcessorImpl被加载了。。。 lazyLoadingBean被设置成懒加载了。 com.ubuntuvim.spring.beanfactorypostprocessor.LazyLoadingBean被加载了。。。
可以看到MyBeanFactoryPostProcessorImpl被加载了,LazyLoadingBean也被加载了,完美符合预期。
待跟进 学习PropertyResourceConfigurer是如何替换类中的占位符@Value("${xxx}")。
BeanDefinitionRegistryPostProcessor接口 BeanDefinitionRegistryPostProcessor接口的提供的扩展功能是:
BeanDefinitionRegistryPostProcessor接口是BeanFactoryPostProcessor接口的子类,它在父类的基础上增加了postProcessBeanDefinitionRegistry()方法。允许用户获取BeanDefinitionRegistry对象,从而可以通过编码方式动态修改、新增 BeanDefinition。
此接口一个非常重要的实现类就是ConfigurationClassPostProcessor,这个类用于解析@Component,@Service,@ComponentScan,@Configuration等注解,把注解对应的类转换成BeanDefinition然后注册到IoC容器中。
接口源码 1 2 3 4 5 6 7 8 9 10 11 12 13 14 15 16 17 18 19 20 21 22 23 24 25 26 27 28 29 30 31 32 33 34 35 36 37 38 package org.springframework.beans.factory.support;import org.springframework.beans.BeansException;import org.springframework.beans.factory.config.BeanFactoryPostProcessor;public interface BeanDefinitionRegistryPostProcessor extends BeanFactoryPostProcessor void postProcessBeanDefinitionRegistry (BeanDefinitionRegistry registry) throws BeansException }
使用案例 自定义一个实现类,通过编码的方式往容器注入一个bean定义。
1 2 3 4 5 6 7 8 9 10 11 12 13 14 15 16 17 18 19 20 21 22 23 24 25 26 27 28 29 30 31 32 33 34 35 package com.ubuntuvim.spring.beanfactorypostprocessor;import org.springframework.beans.BeansException;import org.springframework.beans.factory.config.ConfigurableListableBeanFactory;import org.springframework.beans.factory.support.BeanDefinitionRegistry;import org.springframework.beans.factory.support.BeanDefinitionRegistryPostProcessor;import org.springframework.beans.factory.support.RootBeanDefinition;import org.springframework.context.annotation.Lazy;import org.springframework.stereotype.Component;@Component @Lazy public class MyBeanDefinitionRegistryPostProcessor implements BeanDefinitionRegistryPostProcessor public MyBeanDefinitionRegistryPostProcessor () System.out.println("\n" + this .getClass().getName() + "被加载了。。。\n" ); } @Override public void postProcessBeanDefinitionRegistry (BeanDefinitionRegistry registry) throws BeansException registry.registerBeanDefinition(InjectBeanFromPostProcessor.class.getName(), new RootBeanDefinition(InjectBeanFromPostProcessor.class)); } @Override public void postProcessBeanFactory (ConfigurableListableBeanFactory beanFactory) throws BeansException } }
InjectBeanFromPostProcessor并没有使用任何注解,也没有通过其他方式导入。
1 2 3 4 5 6 7 8 9 10 11 12 13 14 package com.ubuntuvim.spring.beanfactorypostprocessor;public class InjectBeanFromPostProcessor public InjectBeanFromPostProcessor () System.out.println("\n" + this .getClass().getName() + "被加载了。。。\n" ); } }
运行结果:
1 2 3 4 com.ubuntuvim.spring.beanfactorypostprocessor.MyBeanDefinitionRegistryPostProcessor被加载了。。。 com.ubuntuvim.spring.beanfactorypostprocessor.InjectBeanFromPostProcessor被加载了。。。
结果符合预期,InjectBeanFromPostProcessor成功注册到IoC容器中,并且可以被IoC容器实例化。
以上两个接口就是Spring框架提供的第一个扩展点,用于修改为实例化之前的bean定义信息。
ConfigurationClassPostProcessor接口 接口源码 使用案例 ConfigurationClassPostProcessor接口 接口源码 使用案例 SmartInitializingSingleton接口 这个接口Spring4.1之后才有
SmartInitializingSingleton是spring 4.1中引入的新特效,与InitializingBean的功能类似,都是bean实例化后执行自定义初始化 ,都是属于spring bean生命周期 的增强。但是,SmartInitializingSingleton的定义及触发方式方式上有些区别 ,它的定义不在当前的bean中(a bean’s local construction phase),它是回调接口(针对非lazy单例Bean ),回调的操作是由spring事件ContextRefreshedEvent触发。
接口源码 1 2 3 4 5 6 7 8 9 10 11 12 13 14 15 16 17 18 19 20 21 22 23 package org.springframework.beans.factory;public interface SmartInitializingSingleton void afterSingletonsInstantiated () }
SmartInitializingSingleton接口的实现主要是Spring框架内部使用,目前Spring框架内部已经有差不多30个实现类。
一个很典型的应用是EventListenerMethodProcessor类,这个类的作用的是用来对 @EventListener 提供支持.
主要是标注了@EventListener 的方法进行解析, 然后转换为一个 ApplicationListener。解析的方法就是实现了SmartInitializingSingleton接口的afterSingletonsInstantiated()方法,在这个方法中处理。
使用案例 定义一个实现类,同时实现了SmartInitializingSingleton接口和InitializingBean接口,并且在类中使用@PostConstruct注解。验证这几种方式的初始化执行顺序。
1 2 3 4 5 6 7 8 9 10 11 12 13 14 15 16 17 18 19 20 21 22 23 24 25 26 27 28 29 30 31 32 33 34 35 36 37 38 39 40 41 42 package com.ubuntuvim.spring.beanpostprocess;import org.springframework.beans.BeansException;import org.springframework.beans.factory.InitializingBean;import org.springframework.beans.factory.SmartInitializingSingleton;import org.springframework.context.ApplicationContext;import org.springframework.context.ApplicationContextAware;import org.springframework.stereotype.Component;import javax.annotation.PostConstruct;@Component public class MySmartInitializingSingletonImpl implements SmartInitializingSingleton , ApplicationContextAware , InitializingBean ApplicationContext applicationContext; @PostConstruct public void invokePostConstruct () System.out.println("1. @PostConstruct注释方法被执行" ); } @Override public void afterSingletonsInstantiated () System.out.println("3. SmartInitializingSingleton接口的afterSingletonsInstantiated()方法被执行了" ); InitBean initBean = applicationContext.getBean(InitBean.class); initBean.f(); } @Override public void setApplicationContext (ApplicationContext applicationContext) throws BeansException this .applicationContext = applicationContext; } @Override public void afterPropertiesSet () throws Exception System.out.println("2. InitializingBean接口的afterPropertiesSet()方法被执行了" ); } }
执行结果:
1 2 3 4 1. @PostConstruct注释方法被执行 2. InitializingBean接口的afterPropertiesSet()方法被执行了 3. SmartInitializingSingleton接口的afterSingletonsInstantiated()方法被执行了 com.ubuntuvim.spring.beanpostprocess.InitBean的方法f()被调用
<<<<<<< HEAD
InstantiationAwareBeanPostProcessor接口 此接口主要的作用于目标对象实例化过程需要处理的事情,包括实例化对象前后过程以及实例化属性的设置。InstantiationAwareBeanPostProcessor是Spring框架非常非常重要的接口,不亚于BeanPostProcessor接口。特别是Spring框架内部,非常多的扩展功能都是通过实现InstantiationAwareBeanPostProcessor接口完成的。比如:AutowiredAnnotationBeanPostProcessor就是实现这个接口的实现了@Autowire和@Value注解的处理,这个接口还有一个很重要的子接口SmartInstantiationAwareBeanPostProcessor。
对于Spring框架的用户,Spring推荐使用它的一个适配器类InstantiationAweraBeanPostProcessorAdapter。
接口源码 1 2 3 4 5 6 7 8 9 10 11 12 13 14 15 16 17 18 19 20 21 22 23 24 25 26 27 28 29 30 31 32 33 34 35 36 37 38 39 40 41 42 43 44 45 46 47 48 49 50 51 52 53 package org.springframework.beans.factory.config;import org.springframework.beans.BeansException;import org.springframework.beans.PropertyValues;import org.springframework.lang.Nullable;import java.beans.PropertyDescriptor;public interface InstantiationAwareBeanPostProcessor extends BeanPostProcessor @Nullable default Object postProcessBeforeInstantiation (Class<?> beanClass, String beanName) throws BeansException return null ; } default boolean postProcessAfterInstantiation (Object bean, String beanName) throws BeansException return true ; } @Nullable default PropertyValues postProcessProperties (PropertyValues pvs, Object bean, String beanName) throws BeansException { return null ; } @Deprecated @Nullable default PropertyValues postProcessPropertyValues ( PropertyValues pvs, PropertyDescriptor[] pds, Object bean, String beanName) throws BeansException return pvs; } }
此接口的主要作用在目标对象的实例化过程中需要处理的事情 ,包括实例化对象的前后过程以及实例的属性设置。此接口是Spring框架内部使用的非常重要的接口,它是BeanPostProcessor的一个子接口,总共有6个方法。
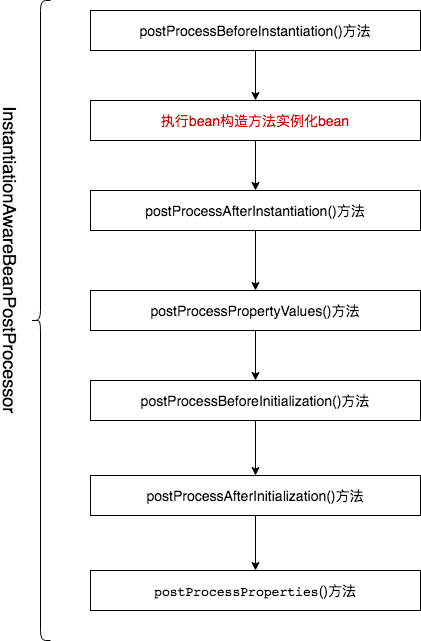
postProcessBeforeInitialization()方法,继承至父类BeanPostProcessor接口中的方法,在Bean实例化完成且初始化方法执行之前 执行
postProcessAfterInitialization()方法,继承至父类BeanPostProcessor接口中的方法,在Bean实例化完成且初始化方法执行完成之后 执行
postProcessBeforeInstantiation()方法,自身方法,是最先执行的方法,它在目标对象实例化之前 调用,该方法的返回值类型是Object,我们可以返回任何类型的值。postProcessAfterInitialization()方法会调用,其它方法不再调用;否则按照正常的流程走
postProcessAfterInstantiation()方法,在目标对象实例化之后 调用,这个时候对象已经被实例化,但是该实例的属性还未被设置,都是null。postProcessPropertyValues()方法的其中一个因素(因为还有一个因素是mbd.getDependencyCheck());false,并且不需要check,那么postProcessPropertyValues()方法就会被忽略不执行;如果返回true,postProcessPropertyValues()方法就会被执行
postProcessPropertyValues()方法(已经声明为过时,5.1版本之后推荐使用postProcessPropertyValues()方法),自身方法,对属性值进行修改;如果postProcessAfterInstantiation()方法返回false,该方法不会被调用。可以在该方法内对属性值进行修改
postProcessProperties()方法,此方法和postProcessPropertyValues()方法是同样的作用。5.1版本之后推荐使用的方法。
这个几个方法执行顺序如下图:
使用案例 接下来,通过学习Spring框架内部使用的实现类来学习这个接口的使用场景。
实现类之一AutowiredAnnotationBeanPostProcessor 此后置处理器是一个集大成者,它做了非常非常多的事情。是Spring框架非常重要第一个后置处理器,首先看下类结构。
graph BT
AutowiredAnnotationBeanPostProcessor -.-> MergedBeanDefinitionPostProcessor
MergedBeanDefinitionPostProcessor --> BeanPostProcessor
AutowiredAnnotationBeanPostProcessor -.-> PriorityOrdered
PriorityOrdered --> Ordered
AutowiredAnnotationBeanPostProcessor --> InstantiationAwareBeanPostProcessorAdapter
InstantiationAwareBeanPostProcessorAdapter -.-> SmartInstantiationAwareBeanPostProcessor
SmartInstantiationAwareBeanPostProcessor --> InstantiationAwareBeanPostProcessor
InstantiationAwareBeanPostProcessor --> BeanPostProcessor
AutowiredAnnotationBeanPostProcessor -.-> BeanFactoryAware
BeanFactoryAware --> Aware
从类继承关系可以看到,它继承两个非常重要的后置处理器,第一个是MergedBeanDefinitionBeanPostProcessor,第二个是InstantiationAwareBeanPostProcessor。第一个在下一篇将会为你解析,第二个后置处理器在前面介绍过,AutowiredAnnotationBeanPostProcessor就是它的一个很重要的实现。
那么AutowiredAnnotationBeanPostProcessor重新实现这两个接口之后有做了什么呢??
首先大概介绍它的功能:
处理@Value注解
处理@Autowired注解处理@Inject注解
处理构造方法属性注入
注意 :如果一个属性同时使用了@Autowired注解,也使用xml方式注入。那么注解注入的值会被xml注入的值覆盖,也就是说xml方式的注入是在注解注入之后执行。
另外AutowiredAnnotationBeanPostProcessor这个后置处理器在框架内部不是必须加载的,只有在项目中使用了@ComponentScan注解或者使用了<context:component-scan>标签或者使用<context:annotation-config>标签,Spring容器会自动加载此后置处理器。如果你自定义了或者重写了它,在项目加载时请把它排除,以免冲突。
摘其中2个很重要的方法讲下,一个是postProcessMergedBeanDefinition()方法,此方法用于查找出bean中使用了@Autowired注解的属性和使用此注解的方法,并且把属性名和方法名缓存起来;另一个方法是postProcessProperties(),这个方法用于属性值的注入,直接从缓存中获取到属性名或者方法名,然后通过反射注入值。
postProcessMergedBeanDefinition方法 查找出bean中使用了@Autowired注解的属性和使用此注解的方法。
1 2 3 4 5 6 7 8 9 10 11 12 13 14 15 16 17 18 19 20 21 22 23 24 25 26 27 28 29 30 31 32 33 34 @Override public void postProcessMergedBeanDefinition (RootBeanDefinition beanDefinition, Class<?> beanType, String beanName) InjectionMetadata metadata = findAutowiringMetadata(beanName, beanType, null ); metadata.checkConfigMembers(beanDefinition); } private InjectionMetadata findAutowiringMetadata (String beanName, Class<?> clazz, @Nullable PropertyValues pvs) String cacheKey = (StringUtils.hasLength(beanName) ? beanName : clazz.getName()); InjectionMetadata metadata = this .injectionMetadataCache.get(cacheKey); if (InjectionMetadata.needsRefresh(metadata, clazz)) { synchronized (this .injectionMetadataCache) { metadata = this .injectionMetadataCache.get(cacheKey); if (InjectionMetadata.needsRefresh(metadata, clazz)) { if (metadata != null ) { metadata.clear(pvs); } metadata = buildAutowiringMetadata(clazz); this .injectionMetadataCache.put(cacheKey, metadata); } } } return metadata; }
这个方法是在创建bean的过程中回调方法。调用位置在:
1 2 AbstractAutowireCapableBeanFactory#doCreateBean > AbstractAutowireCapableBeanFactory#applyMergedBeanDefinitionPostProcessors
详细调用代码:
1 2 3 4 5 6 7 8 9 10 11 12 13 14 15 16 17 synchronized (mbd.postProcessingLock) { if (!mbd.postProcessed) { try { applyMergedBeanDefinitionPostProcessors(mbd, beanType, beanName); } catch (Throwable ex) { throw new BeanCreationException(mbd.getResourceDescription(), beanName, "Post-processing of merged bean definition failed" , ex); } mbd.postProcessed = true ; } }
调用的时机是:bean实例化之后,属性填充之前(当然也是在初始化之前,属性填充完成才到初始化回调)。
通过方法findAutowiringMetadata()把使用@Autowired属性或者方法都找到并缓存到injectionMetadataCache里面,然后在填充属性的时候使用。
postProcessProperties方法 此方法用于注入属性值。
1 2 3 4 5 6 7 8 9 10 11 12 13 14 15 16 17 18 19 20 public PropertyValues postProcessProperties (PropertyValues pvs, Object bean, String beanName) InjectionMetadata metadata = findAutowiringMetadata(beanName, bean.getClass(), pvs); try { metadata.inject(bean, beanName, pvs); } catch (BeanCreationException ex) { throw ex; } catch (Throwable ex) { throw new BeanCreationException(beanName, "Injection of autowired dependencies failed" , ex); } return pvs; }
postProcessProperties()方法的调用时机是在postProcessMergedBeanDefinition()方法之后,调用外置也是在创建bean的时候。调用位置如下:
1 2 AbstractAutowireCapableBeanFactory#doCreateBean >AbstractAutowireCapableBeanFactory#populateBean
调用时机:bean实例化完成之后,初始化之前,而且是在postProcessAfterInstantiation()方法之后。如果不记得请回到文章开头的调用顺序图。Spring框架内部的后置处理器回调时机是非常重要的。
调用代码:
1 2 3 4 5 6 7 8 9 10 11 12 13 14 15 16 17 18 19 20 21 22 23 24 25 26 27 28 29 30 31 32 33 34 35 36 37 38 39 40 41 42 43 44 45 46 47 48 49 50 51 52 53 54 55 protected void populateBean (String beanName, RootBeanDefinition mbd, @Nullable BeanWrapper bw) PropertyDescriptor[] filteredPds = null ; if (hasInstAwareBpps) { if (pvs == null ) { pvs = mbd.getPropertyValues(); } for (BeanPostProcessor bp : getBeanPostProcessors()) { if (bp instanceof InstantiationAwareBeanPostProcessor) { InstantiationAwareBeanPostProcessor ibp = (InstantiationAwareBeanPostProcessor) bp; PropertyValues pvsToUse = ibp.postProcessProperties(pvs, bw.getWrappedInstance(), beanName); if (pvsToUse == null ) { if (filteredPds == null ) { filteredPds = filterPropertyDescriptorsForDependencyCheck(bw, mbd.allowCaching); } pvsToUse = ibp.postProcessPropertyValues(pvs, filteredPds, bw.getWrappedInstance(), beanName); if (pvsToUse == null ) { return ; } } pvs = pvsToUse; } } } }
代码的逻辑是比较简单的,获取到后置处理器后执行对应的回调完成的。详细的解释也可以看源码的注释。
到此通过Spring框架内部的AutowiredAnnotationBeanPostProcessor类学习了InstantiationAwareBeanPostProcessor这个后置处理器的使用。
如果你在开发过程中也需要用到一些自定义的注解,而又不知道该在什么时候让自定义的注解生效。那么你可以参考AutowiredAnnotationBeanPostProcessor的实现,来完成自定义注解的解析、应用。
=======
InstantiationAwareBeanPostProcessor接口或者InstantiationAwareBeanPostProcessorAdapter 接口源码 使用案例
8acc8492f5f2286c54fa6be583a14cccfeed7585
MergedBeanDefinitionPostProcessor接口 接口源码 使用案例 SmartInstantiationAwareBeanPostProcessor接口 <<<<<<< HEADInstantiationAwareBeanPostProcessorAdapter
接口源码 使用案例
8acc8492f5f2286c54fa6be583a14cccfeed7585
BeanFactoryAware/ApplicationContextAware/BeanNameAware接口 接口源码 使用案例 CommonAnnotationBeanPostProcessor <<<<<<< HEADInitDestoryAnnotationBeanPostProcessor
AutowiredAnnotationBeanPostProcessor 同前面的InstantiationAwareBeanPostProcessor
InitDestroyAnnotationBeanPostProcessor类 单从类名字看就大概能猜到它的作用。此类就是用于处理初始化注解@PostConstruct和销毁注解PreDestroy。这两个注解在平常的Spring项目中也是非常采用的注解,特别是前者,通常用于自定义初始化逻辑。
首先看下类结构,看下它实现哪些后置处理器接口。
graph BT
InitDestroyAnnotationBeanPostProcessor -.-> DestructionAwareBeanPostProcessor
DestructionAwareBeanPostProcessor --> BeanPostProcessor
InitDestroyAnnotationBeanPostProcessor -.-> MergedBeanDefinitionPostProcessor
MergedBeanDefinitionPostProcessor --> BeanPostProcessor
InitDestroyAnnotationBeanPostProcessor -.-> PriorityOrdered
PriorityOrdered --> Ordered
从类层级结构更加清晰的看到这个后置处理的功能。 它首先是一个后置处理器,也是可设置顺序的;并且它还实现bean定义接口,也就是说这个类也是可以修改bean定义信息的。
其中核心的方法源码如下:
接口源码 1 2 3 4 5 6 7 8 9 10 11 12 13 14 15 16 17 18 19 20 21 22 23 24 25 26 27 28 29 30 31 32 33 34 35 36 37 38 39 40 41 42 43 44 45 46 47 48 49 50 51 52 53 54 55 56 57 58 59 60 61 62 63 64 65 66 67 68 69 70 71 72 73 74 75 76 77 78 79 80 81 82 83 84 85 86 87 88 89 90 91 92 93 94 95 96 97 98 99 100 101 102 103 104 105 106 107 108 109 110 111 112 113 114 115 116 117 118 119 120 121 122 123 124 125 126 127 128 129 130 131 132 133 134 135 136 137 138 139 140 public class InitDestroyAnnotationBeanPostProcessor implements DestructionAwareBeanPostProcessor , MergedBeanDefinitionPostProcessor , PriorityOrdered , Serializable { @Override public void postProcessMergedBeanDefinition (RootBeanDefinition beanDefinition, Class<?> beanType, String beanName) LifecycleMetadata metadata = findLifecycleMetadata(beanType); metadata.checkConfigMembers(beanDefinition); } @Override public Object postProcessBeforeInitialization (Object bean, String beanName) throws BeansException LifecycleMetadata metadata = findLifecycleMetadata(bean.getClass()); try { metadata.invokeInitMethods(bean, beanName); } catch (InvocationTargetException ex) { throw new BeanCreationException(beanName, "Invocation of init method failed" , ex.getTargetException()); } catch (Throwable ex) { throw new BeanCreationException(beanName, "Failed to invoke init method" , ex); } return bean; } @Override public Object postProcessAfterInitialization (Object bean, String beanName) throws BeansException return bean; } @Override public void postProcessBeforeDestruction (Object bean, String beanName) throws BeansException LifecycleMetadata metadata = findLifecycleMetadata(bean.getClass()); try { metadata.invokeDestroyMethods(bean, beanName); } catch (InvocationTargetException ex) { String msg = "Destroy method on bean with name '" + beanName + "' threw an exception" ; if (logger.isDebugEnabled()) { logger.warn(msg, ex.getTargetException()); } else { logger.warn(msg + ": " + ex.getTargetException()); } } catch (Throwable ex) { logger.warn("Failed to invoke destroy method on bean with name '" + beanName + "'" , ex); } } private LifecycleMetadata findLifecycleMetadata (Class<?> clazz) if (this .lifecycleMetadataCache == null ) { return buildLifecycleMetadata(clazz); } LifecycleMetadata metadata = this .lifecycleMetadataCache.get(clazz); if (metadata == null ) { synchronized (this .lifecycleMetadataCache) { metadata = this .lifecycleMetadataCache.get(clazz); if (metadata == null ) { metadata = buildLifecycleMetadata(clazz); this .lifecycleMetadataCache.put(clazz, metadata); } return metadata; } } return metadata; } private LifecycleMetadata buildLifecycleMetadata (final Class<?> clazz) if (!AnnotationUtils.isCandidateClass(clazz, Arrays.asList(this .initAnnotationType, this .destroyAnnotationType))) { return this .emptyLifecycleMetadata; } List<LifecycleElement> initMethods = new ArrayList<>(); List<LifecycleElement> destroyMethods = new ArrayList<>(); Class<?> targetClass = clazz; do { final List<LifecycleElement> currInitMethods = new ArrayList<>(); final List<LifecycleElement> currDestroyMethods = new ArrayList<>(); ReflectionUtils.doWithLocalMethods(targetClass, method -> { if (this .initAnnotationType != null && method.isAnnotationPresent(this .initAnnotationType)) { LifecycleElement element = new LifecycleElement(method); currInitMethods.add(element); if (logger.isTraceEnabled()) { logger.trace("Found init method on class [" + clazz.getName() + "]: " + method); } } if (this .destroyAnnotationType != null && method.isAnnotationPresent(this .destroyAnnotationType)) { currDestroyMethods.add(new LifecycleElement(method)); if (logger.isTraceEnabled()) { logger.trace("Found destroy method on class [" + clazz.getName() + "]: " + method); } } }); initMethods.addAll(0 , currInitMethods); destroyMethods.addAll(currDestroyMethods); targetClass = targetClass.getSuperclass(); } while (targetClass != null && targetClass != Object.class); return (initMethods.isEmpty() && destroyMethods.isEmpty() ? this .emptyLifecycleMetadata : new LifecycleMetadata(clazz, initMethods, destroyMethods)); } }
下面逐个介绍这几个核心方法的使用。
postProcessMergedBeanDefinition方法 此方法是实现MergedBeanDefinitionBeanPostProcessor接口的方法。
方法执行入口:
1 2 AbstractAutowireCapableBeanFactory#doCreateBean() > AbstractAutowireCapableBeanFactory#applyMergedBeanDefinitionPostProcessors()
方法执行时机:
bean实例化之后,初始化之前。bean实例化之后就可以通过反射获取到类信息,然后遍历类里面的方法,逐个校验方法是否有使用@PostConstruct或者@PreDestroy注解。
实现逻辑是通过findLifecycleMetadata(beanType)方法实现。这个方法的代码和之前两篇初始化后置处理、实例化后置处理器的逻辑非常相似。查找到符合的方法之后封装成LifecycleMetadata对象,然后在缓存到lifecycleMetadataCache这个ConcurrentHashMap中。
postProcessBeforeInitialization方法 此方法是实现于BeanPostProcessor接口的。
此方法用于执行使用@PostConstruct的方法。底层也是通过反射执行。
方法执行入口:
1 2 3 AbstractAutowireCapableBeanFactory#doCreateBean() > AbstractAutowireCapableBeanFactory#initializeBean() > AbstractAutowireCapableBeanFactory#applyBeanPostProcessorsBeforeInitialization()
方法执行时机:bean实例化后,且bean定义修改之后(postProcessMergedBeanDefinition()方法之后),且在属性填充之后。在bean初始化逻辑里面执行的。
执行的时机可以从Spring的源码摘出来,有兴趣的可以自行阅读AbstractAutowireCapableBeanFactory的doCreateBean()方法逻辑,这个方法可以说是Spring框架实现bean生命周期的最最最核心的方法。
这个方法逻辑也不复杂,就是从缓存里面获取使用@PostConstruct的方法,然后通过反射执行方法。核心的执行逻辑也就是如下两行。
1 2 ReflectionUtils.makeAccessible(this .method); this .method.invoke(target, (Object[]) null );
this.method就是被执行的方法,target就是目标bean,执行方法时参数是null。从这里(Object[]) null也可以看到,@PostConstruct注解定义的方法都是不接受参数的。
postProcessBeforeDestruction方法 此方法实现于DestructionAwareBeanPostProcessor接口。@PreDestroy注解的方法。它的底层也是通过反射执行,和@PostConstruct注解的执行原理是一样的。AbstractApplicationContext.close()方法才会触发调用。doCreateBean()方法中执行,这个方法是用于创建、初始化bean。不能初始化完就销毁了,销毁了那么还用什么呢?
方法执行入口举例:
1 2 3 4 5 6 7 8 9 main方法 > new AnnotationConfigApplicationContext(Config.class).close(); > AbstractApplicationContext#close() > AbstractApplicationContext#doClose() > AbstractApplicationContext#destroyBeans() > DefaultListableBeanFactory#destroySingletons() > DefaultSingletonBeanRegistry#destroySingletons() > DefaultSingletonBeanRegistry#destroyBean()的bean.destroy()这行代码 > DisposableBeanAdapter#destroy()
整个调用层次比较深,你可以打个断点到最后一个方法,然后在main()方法中debug模式运行。DisposableBeanAdapter.destroy()方法是所有销毁回调的执行入口,包括自定义的销毁方法。
1 2 3 4 5 6 7 8 9 10 11 12 13 14 15 16 17 18 19 20 21 22 23 24 25 26 27 28 29 30 31 32 33 34 35 36 37 38 39 40 41 42 43 44 45 46 47 48 49 50 51 52 @Override public void destroy () if (!CollectionUtils.isEmpty(this .beanPostProcessors)) { for (DestructionAwareBeanPostProcessor processor : this .beanPostProcessors) { processor.postProcessBeforeDestruction(this .bean, this .beanName); } } if (this .invokeDisposableBean) { if (logger.isTraceEnabled()) { logger.trace("Invoking destroy() on bean with name '" + this .beanName + "'" ); } try { if (System.getSecurityManager() != null ) { AccessController.doPrivileged((PrivilegedExceptionAction<Object>) () -> { ((DisposableBean) this .bean).destroy(); return null ; }, this .acc); } else { ((DisposableBean) this .bean).destroy(); } } catch (Throwable ex) { String msg = "Invocation of destroy method failed on bean with name '" + this .beanName + "'" ; if (logger.isDebugEnabled()) { logger.warn(msg, ex); } else { logger.warn(msg + ": " + ex); } } } if (this .destroyMethod != null ) { invokeCustomDestroyMethod(this .destroyMethod); } else if (this .destroyMethodName != null ) { Method methodToInvoke = determineDestroyMethod(this .destroyMethodName); if (methodToInvoke != null ) { invokeCustomDestroyMethod(ClassUtils.getInterfaceMethodIfPossible(methodToInvoke)); } } }
到此,InitDestroyAnnotationBeanPostProcessor初始、销毁后置处理器也介绍完了,不知道你看明白了吗?如果有疑问可以给我留言,我把演示的案例代码发给你。篇幅有限就在文章中直接贴代码了。
总结下来,最最最重要的一点就是要搞懂doCreateBean()方法,这个方法是Spring bean生命周期的实现。里面的后置处理器执行顺序决定了bean的实例化、bean定义合并、bean属性填充,bean初始化顺序。并且每个步骤都是通过执行对应的后置处理器来完成的。 接口源码 使用案例 AutowiredAnnotationBeanPostProcessor 接口源码 使用案例 InitDestroyAnnotationBeanPostProcessor接口 接口源码 使用案例 参考资料 https://fangjian0423.github.io/2017/06/20/spring-bean-post-processor/
8acc8492f5f2286c54fa6be583a14cccfeed7585