准备工作
所需软件、jar
创建java项目
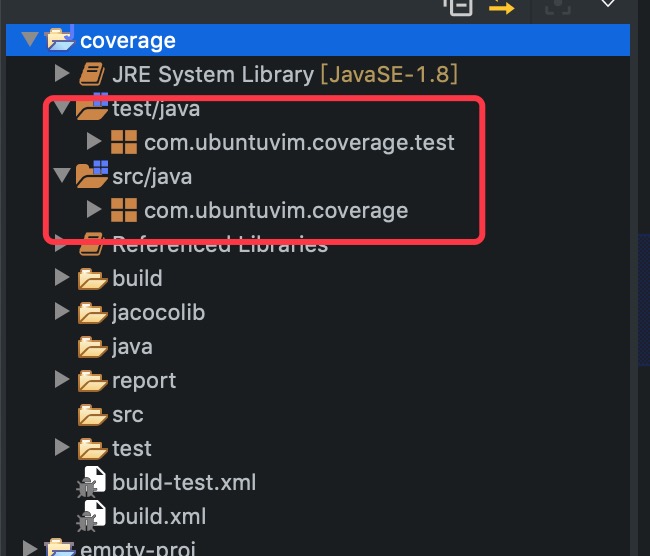
src/java和test/java都是资源目录。
增加依赖jar
在项目根目录下新建目录jacocolib。复制从Junit、jacoco官网下载的jar文件。文件如下:
- hamcrest-core-1.3.jar
- jacocoant.jar
- junit-4.12.jar
这些jar可以直接从我的项目中下载,地址https://github.com/ubuntuvim/coverage/tree/master/jacocolib
编写简单的java代码
如下是我的业务代码,一些简单的判断。
1
2
3
4
5
6
7
8
9
10
11
12
13
14
15
16
17
18
19
20
21
22
23
24
25
26
27
28
29
30
31
| package com.ubuntuvim.coverage;
public class Coverage {
public String normal(int type) {
if (type == 1) {
return "one";
} else {
return "other";
}
}
public int exceptMethod(int p) {
p = (p + 10) / p;
return p;
}
public int throwExcept(int p) throws MyException {
try {
p = (p + 10) / p;
} catch (Exception e) {
throw new MyException("0不能做分母。");
}
return p;
}
}
|
自定义的异常类。
1
2
3
4
5
6
7
8
9
10
11
| package com.ubuntuvim.coverage;
public class MyException extends Exception {
private static final long serialVersionUID = 1L;
public MyException(String message) {
super(message);
}
}
|
代码没什么好说的了,非常简单。关键看单元测试方法。
编写单元测试
下面的单元测试是针对Coverage.java类中三个方法normal、exceptionMethod和throwException的单元测试。
1
2
3
4
5
6
7
8
9
10
11
12
13
14
15
16
17
18
19
20
21
22
23
24
25
26
27
28
29
30
31
32
33
34
35
36
37
38
39
40
41
42
43
44
45
46
47
48
49
50
51
52
53
54
55
56
57
58
59
60
| package com.ubuntuvim.coverage;
import static org.junit.Assert.assertEquals;
import org.junit.Before;
import org.junit.Rule;
import org.junit.Test;
import org.junit.rules.ExpectedException;
public class CoverageTest {
@Rule
public ExpectedException thrown = ExpectedException.none();
private Coverage c = null;
@Before
public void setUp() {
c = new Coverage();
}
@Test
public void testNormalOne() {
String s = c.normal(1);
assertEquals("one", s);
}
@Test
public void testNormalOther() {
String s = c.normal(2);
assertEquals("other", s);
}
@Test
public void testExceptMethodP() {
int i = c.exceptMethod(10);
assertEquals(2, i);
}
@Test(expected = ArithmeticException.class)
public void testExceptMethod() {
c.exceptMethod(0);
}
@Test
public void testThrowExceptP() throws MyException {
int i = c.throwExcept(10);
assertEquals(2, i);
}
@Test
public void testThrowExcept() throws MyException {
thrown.expect(MyException.class);
thrown.expectMessage("0不能做分母。");
c.throwExcept(0);
}
}
|
有关Junit的使用请自行学习。
为了达到100%覆盖,需要对normal、exceptionMethod和throwException这三个方法中每一种情况都编写单元测试方法。具体请看上述代码。
单元测试代码编写好之后可以先运行。在CoverageTest.java上右键 -> 选择Coverage As -> 选择Junit Test。
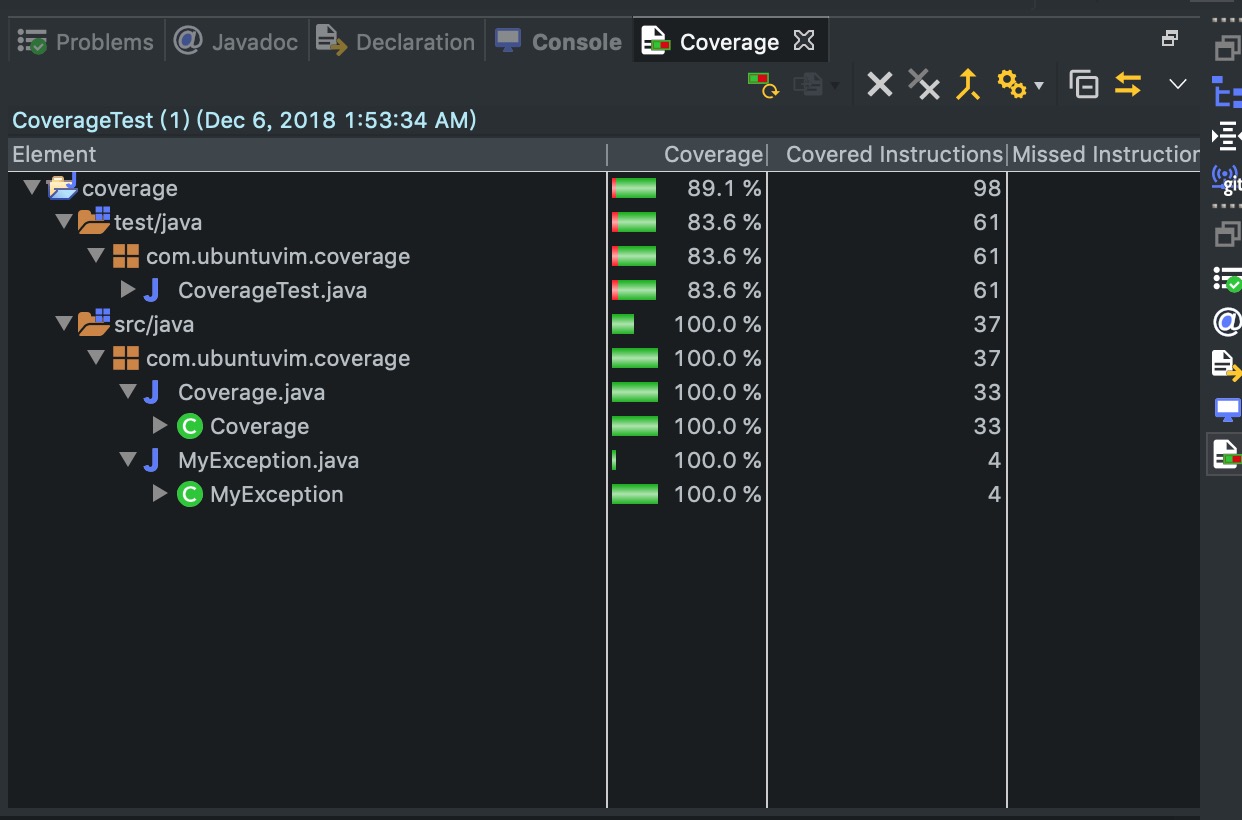
执行完毕之后会有如下截图结果:
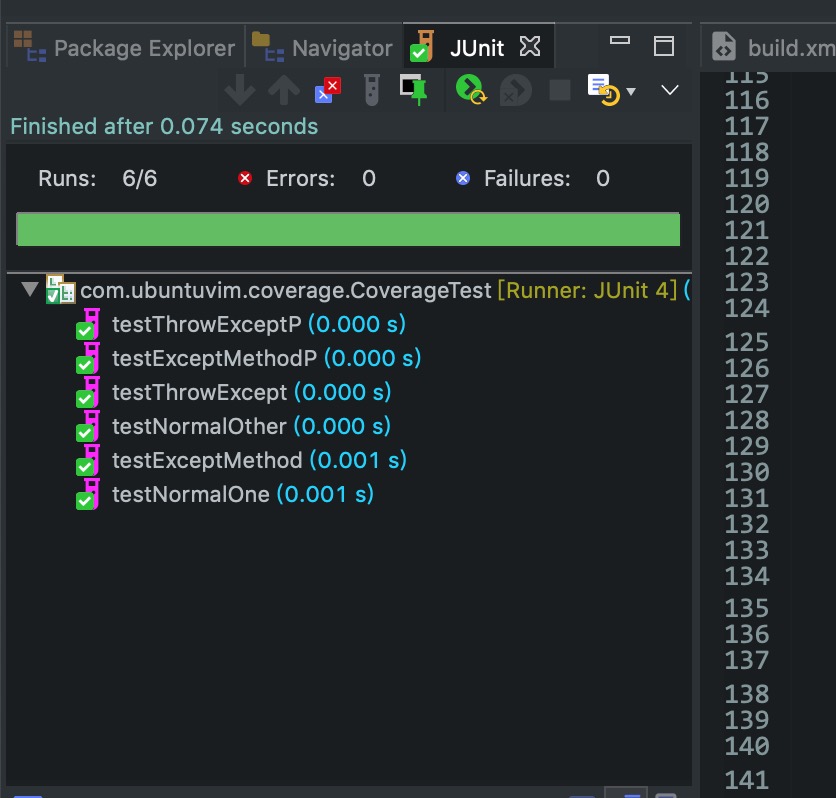
打开Coverage视图,可以看到我们的代码达到了100%的覆盖率。也就是说我们的代码中所有分子都已经被测试通过。
自动执行单元测试
上述右键使用Coverage As运行一个测试类,如果有多个测试的情况要如何处理呢?可以借助于ant。使用ant自动编译java代码。
在项目根目录下创建build.xml,文件内容如下:
1
2
3
4
5
6
7
8
9
10
11
12
13
14
15
16
17
18
19
20
21
22
23
24
25
26
27
28
29
30
31
32
33
34
35
36
37
38
39
40
41
42
43
44
45
46
47
48
49
50
51
52
53
54
55
56
57
58
59
60
61
62
| <?xml version="1.0" encoding="UTF-8"?>
<project name="AntTestReporting" basedir="." default="compile">
<!-- general -->
<property name="DEBUG" value="true" />
<property name="VERBOSE" value="true" />
<property name="TARGET" value="1.8" />
<!-- folder -->
<property name="build.dir" value="build" />
<property name="src.dir" value="src/java" />
<property name="src.classess.dir" value="${build.dir}/classess" />
<property name="test.dir" value="test/java" />
<property name="test.classess.dir" value="${build.dir}/test-classess" />
<property name="third-party-lib" value="jacocolib" />
<!-- classpath -->
<path id="classpath">
<fileset dir="${third-party-lib}">
<include name="**/*.jar" />
</fileset>
</path>
<!-- targets -->
<target name="clean">
<delete dir="${build.dir}" />
</target>
<target name="init">
<mkdir dir="${build.dir}" />
<mkdir dir="${src.classess.dir}" />
<mkdir dir="${test.classess.dir}" />
</target>
<target name="compile" depends="clean, init">
<!-- Create the time stamp -->
<tstamp>
<format property="lastUpdated" pattern="yyyy-MM-dd HH:mm:ss" />
</tstamp>
<!-- 编译java代码 -->
<javac target="${TARGET}" debug="${DEBUG}" verbose="${VERBOSE}" classpathref="classpath"
optimize="true" destdir="${src.classess.dir}" srcdir="${src.dir}">
</javac>
<echo>======== java代码编译完毕 ========</echo>
<path id="classpath.src.dir">
<pathelement location="${src.classess.dir}" />
<!-- 引入第三方jar -->
<fileset dir="${third-party-lib}">
<include name="**/*.jar" />
</fileset>
</path>
<!-- 编译test代码 -->
<javac target="${TARGET}" debug="${DEBUG}" verbose="${VERBOSE}"
optimize="true" destdir="${test.classess.dir}" srcdir="${test.dir}">
<!-- test代码依赖src的代码和第三方jar -->
<classpath refid="classpath.src.dir" />
</javac>
<echo>======== test代码编译完毕 ========</echo>
</target>
</project>
|
这个脚本主要做了两件事:
- 编译
src/java目录下面的java代码到目录build/classess下。
- 编译
test/java目录下面的java代码到目录build/test-classess下。
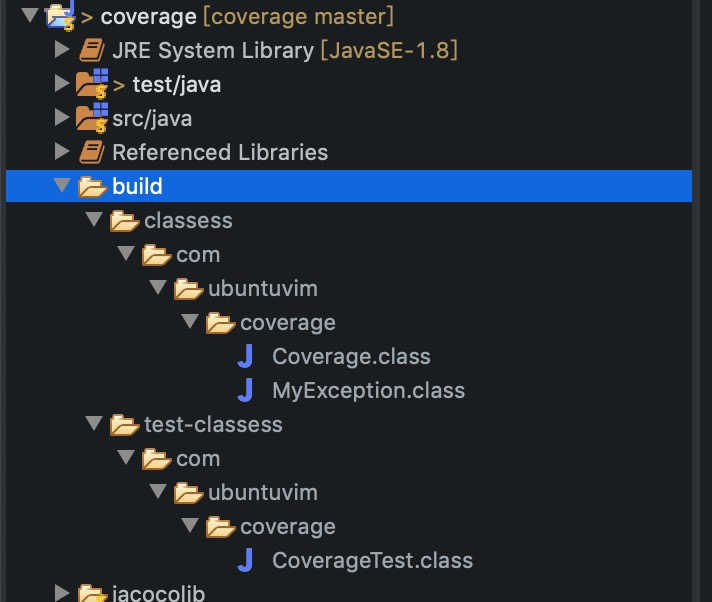
在这个文件上右键 -> Run As -> Ant Build。执行完毕后,刷新项目。可以看到在项目根目录下自动创建了一个名为build的目录。展开之后可以看到项目的所有class文件。
自动生成覆盖率报告
编译之后得到你的业务代码class文件和单元测试的class文件。那么如何批量运行这些class呢?
同样的也是使用Ant。
在项目根目录下创建build-test.xml,文件内容如下:
1
2
3
4
5
6
7
8
9
10
11
12
13
14
15
16
17
18
19
20
21
22
23
24
25
26
27
28
29
30
31
32
33
34
35
36
37
38
39
40
41
42
43
44
45
46
47
48
49
50
51
52
53
54
55
56
57
58
59
60
61
62
63
64
65
66
67
68
69
70
71
72
73
74
75
76
77
78
79
80
81
82
83
84
85
86
87
88
89
90
91
| <?xml version="1.0" encoding="UTF-8"?>
<project name="AntTestReporting-test" basedir="." default="all-test" xmlns:jacoco="antlib:org.jacoco.ant">
<import file="build.xml" />
<!-- Java Code Coverage -->
<taskdef uri="antlib:org.jacoco.ant" resource="org/jacoco/ant/antlib.xml">
<classpath path="jacocolib/jacocoant.jar" />
</taskdef>
<property name="reports.dir" value="${basedir}/reports" />
<property name="test.data.dir" value="${reports.dir}/testResults" />
<property name="coverage.reports.dir" value="${reports.dir}/coverage" />
<property name="xms" value="-Xms256m" />
<property name="xmx" value="-Xmx1024m" />
<!-- <property name="log4j.config" value="-Dlog4j.configuration=file:/${base.dir}/test/log4j-test.properties" /> -->
<!-- test代码类路径,包括src代码、测试代码本身、jacoco jar -->
<path id="classpath.test.dir">
<!-- 测试代码依赖src代码,需要作为test代码的运行classpath -->
<path refid="classpath.src.dir"/>
<pathelement location="${test.classess.dir}" />
</path>
<target name="init-report-dir">
<delete dir="${test.data.dir}" />
<delete dir="${coverage.reports.dir}" />
<delete dir="${reports.dir}" />
<mkdir dir="${reports.dir}" />
<mkdir dir="${test.data.dir}" />
<mkdir dir="${coverage.reports.dir}" />
</target>
<target name="test" depends="init-report-dir, compile">
<echo>========= 运行所有test类 =========</echo>
<jacoco:coverage destfile="${test.data.dir}/jacoco.exec">
<junit printsummary="true" haltonfailure="false" fork="yes" forkmode="once">
<jvmarg value="${xms}" />
<jvmarg value="${xmx}" />
<classpath refid="classpath.test.dir" />
<formatter type="xml" />
<!-- 执行 *Test类 -->
<batchtest todir="${test.data.dir}">
<fileset dir="${test.classess.dir}">
<!-- Exclude inner classes -->
<exclude name="**/*$*.class" />
<include name="**/*Test.class" />
</fileset>
</batchtest>
</junit>
</jacoco:coverage>
<!-- Generate HTML report
- junit-noframes.html -> Single page HTML-report
- index.html -> HTML-report using frames (several files, but more comfortable to read)-->
<echo>========= 生成Junit报告 =========</echo>
<junitreport todir="${test.data.dir}">
<fileset dir="${test.data.dir}">
<include name="TEST-*.xml" />
</fileset>
</junitreport>
<!-- Generate Code Coverage report
See: http://www.eclemma.org/jacoco/trunk/doc/ant.html -->
<echo>========= 生成覆盖率报告 =========</echo>
<jacoco:report>
<executiondata>
<file file="${test.data.dir}/jacoco.exec" />
</executiondata>
<structure name="AntTestReporting">
<classfiles>
<fileset dir="${src.classess.dir}">
<include name="**/*.class" />
<!-- 生成的报告中排除test类 -->
<!-- <exclude name="**/*Test*.class" /> -->
<!-- Exclude inner classes -->
<exclude name="**/*$*.class" />
</fileset>
</classfiles>
</structure>
<html destdir="${coverage.reports.dir}" />
</jacoco:report>
</target>
<target name="all-test" depends="test" />
</project>
|
这个脚本主要做如下三件事:
1. 运行所有test类
1
2
3
4
5
6
7
8
9
10
11
12
13
14
| <jacoco:coverage destfile="${test.data.dir}/jacoco.exec">
<junit printsummary="true" haltonfailure="false" fork="yes" forkmode="once">
<jvmarg value="${xms}" />
<jvmarg value="${xmx}" />
<classpath refid="classpath.test.dir" />
<formatter type="xml" />
<!-- 执行 build/test-classess下面的所有class -->
<batchtest todir="${test.data.dir}">
<fileset dir="${test.classess.dir}">
<include name="**/*Test.class" />
</fileset>
</batchtest>
</junit>
</jacoco:coverage>
|
这段代码就是用于执行Junit方法的,有关Junit标签详细使用说明请移步https://ant.apache.org/manual/。
通过标签batchtest指定了执行的范围,dir属性指定运行的class文件放在build/test-classess。这个目录下有可能有其他的文件所以使用include标签指定只执行名字后缀是Test的class文件。
这段脚本执行完毕之后会在reports/testResults得到一个exec文件。这些文件和目录也是脚本自动创建的。
2. 生成Junit报告
经过第一点的脚本之后,根据执行结果生成Junit报告。报告保存在reports/testResults。这部分是可选的,如果你不想要Junit报告可以删除这段脚本。删除之后再执行在reports/testResults目录下面就不会有TESTS-TestSuites.xml。
1
2
3
4
5
| <junitreport todir="${test.data.dir}">
<fileset dir="${test.data.dir}">
<include name="TEST-*.xml" />
</fileset>
</junitreport>
|
3. 生成覆盖率报告
经过前面两步之后,可以根据前面两步的结果生成覆盖率的报告。报告所依赖的数据就是<file file="${test.data.dir}/jacoco.exec" />。
1
2
3
4
5
6
7
8
9
10
11
12
13
14
15
16
17
18
19
| <jacoco:report>
<executiondata>
<file file="${test.data.dir}/jacoco.exec" />
</executiondata>
<structure name="AntTestReporting">
<classfiles>
<fileset dir="${src.classess.dir}">
<include name="**/*.class" />
<!-- 生成的报告中排除test类 -->
<!-- <exclude name="**/*Test*.class" /> -->
<!-- Exclude inner classes -->
<exclude name="**/*$*.class" />
</fileset>
</classfiles>
</structure>
<html destdir="${coverage.reports.dir}" />
</jacoco:report>
|
最终,整个脚本执行完毕之后,在项目根目录下可以看到如下截图内容:
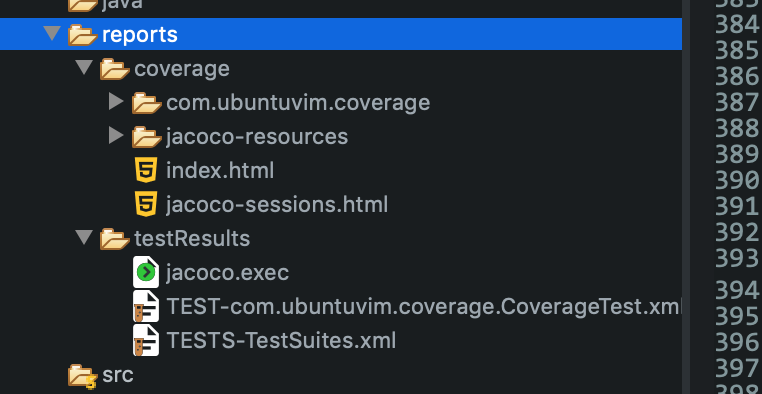
用浏览器打开index.html,在这里文件中可以看到项目所有代码的覆盖率情况。
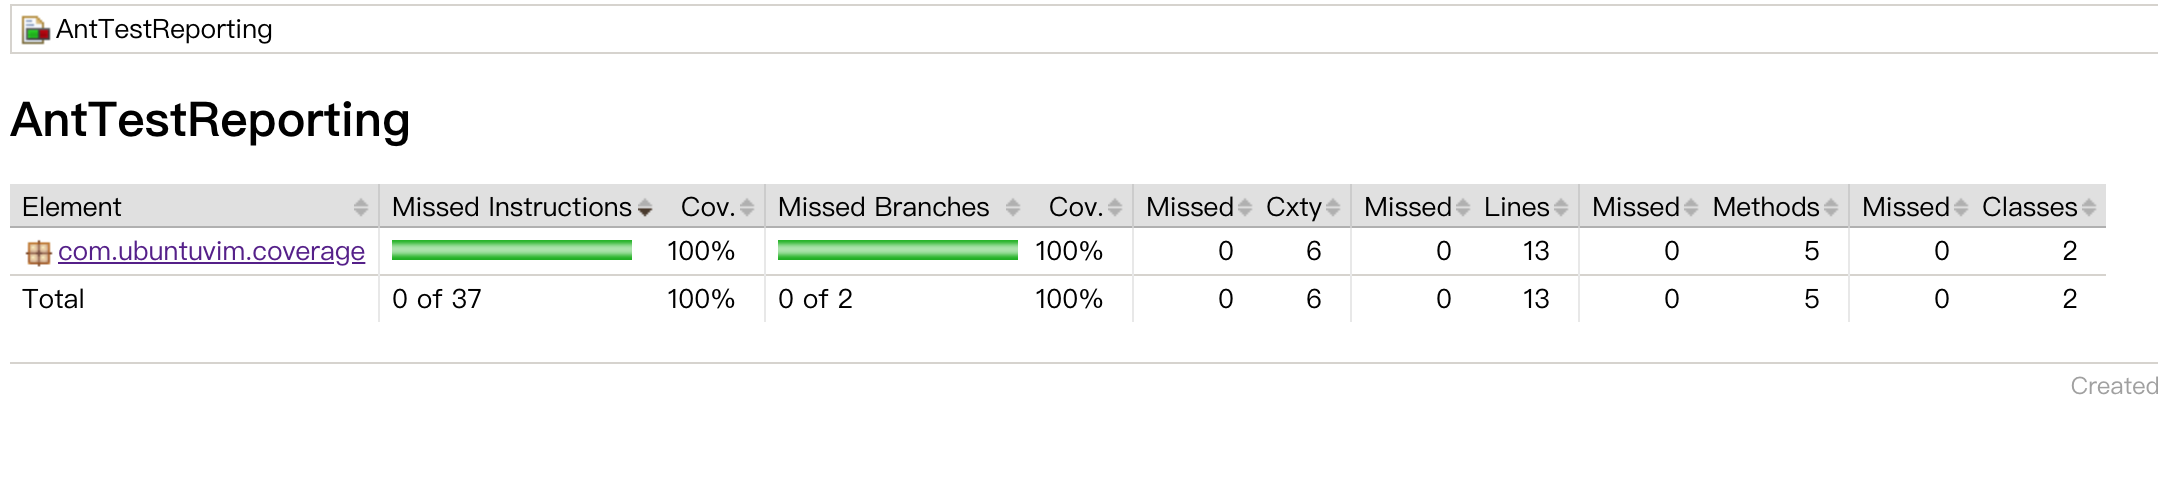
报告单结果和你直接使用Coverage As运行的结果是一致的。如果别人需要项目的结果你就可以把reports目录发给他了,这个就是项目的单元覆盖率结果。
项目源码
https://github.com/ubuntuvim/coverage
后续版本会继承spring,针对spring或者是springMVC项目又是如何做的呢??